projects
contact/buy
A Bronze Roundknife
A few nights ago I wanted something to do and had the idea to make a bronze roundknife. I do have a similar knife already in steel, but its nearly right angle corners make cutting tight curves rather a bit difficult. So the new knife should have a real use, as well as just being a fun project.
The basic plan was to make a rough shape in polycaprolactone, impress it into sand and cast it in bronze made from some scraps found lying around the house, and work out what to do from there, grinding and hammering till satisfied.
Making the Positive
To start out with I prepared a sheet of polycaprolactone at a decent thickness (that of a quarter dollar), by rolling it out and pressing it between two flat peices of granite. Onto this, I traced a paper pattern quickly drawn up with a compass, and then cut out the shape.
While this didn't work out as planned initially, I hoped to use the handle of the knife as a channel throughwhich the bronze to pour, on its way to fan out across the blade. In order to facilitate this I built up the handle on the PCL model to give it what I hoped would be enough thickness for the casting to work out.
While the initial PCL model was rather flat (albeit PCL at that thickness is unfortunately flexible), I had a small problem with warpage as I thickened the handle.
Preparing the Mould
As this project is too big for the system I had been using I opted to do it in some steel cake pans instead, one large one on bottom, upon which to impress the shape, and a springform pan ring to set ontop of it. I'm not sure the top part is strictly needed, but on previous tests with aluminum and pewter it seems to be useful to keep excess metal from going into the mould and building up or running out ontop of the part.
After creating a flat surface on the sand, and pressing the PCL model into it, I packed a little more sand onto of the model and re-flattened the surface so as to ensure a sharp impression without sagging the sand's surface. On the smaller casts this was solved by packing sand in ontop of the mould but here that wasn't possible.
I hand extended the channel a littlebit out from under the springform rim to make an exposed pour in area, and placed the springform pan ontop to cover the body of the knife.
Preparing the Metal
Given that the properties of Aluminum Bronze sounded decent I opted to use that. This was done fairly lazily, so perhaps the quality of metal is not as good as it could have been; copper was sourced from a used peice of plumbing hose, which included some brass fittings that I neglected to remove. I decided to add about 10% by weight aluminium leftover from other casting projects.
To remove corrosion and possible calcium buildup in the copper I let it sit for a while in a weakly acidic bath. After that I placed all I could into the crucible and began heating. Once the first part melted I put in some more (I heated it first a bit with a torch to remove lingering water lest it cause a problem when it goes in the near molten copper). The Aluminium was also put in about the same time.
After the pour, I found the crucible had a fair amount of some crusty, ashy substance which was reluctant to leave, and had to be prompted by gently poking it with a steel stick. I'm not sure what this substance was nor whence it came, but it seems to have been denser than the bronze.
Pouring
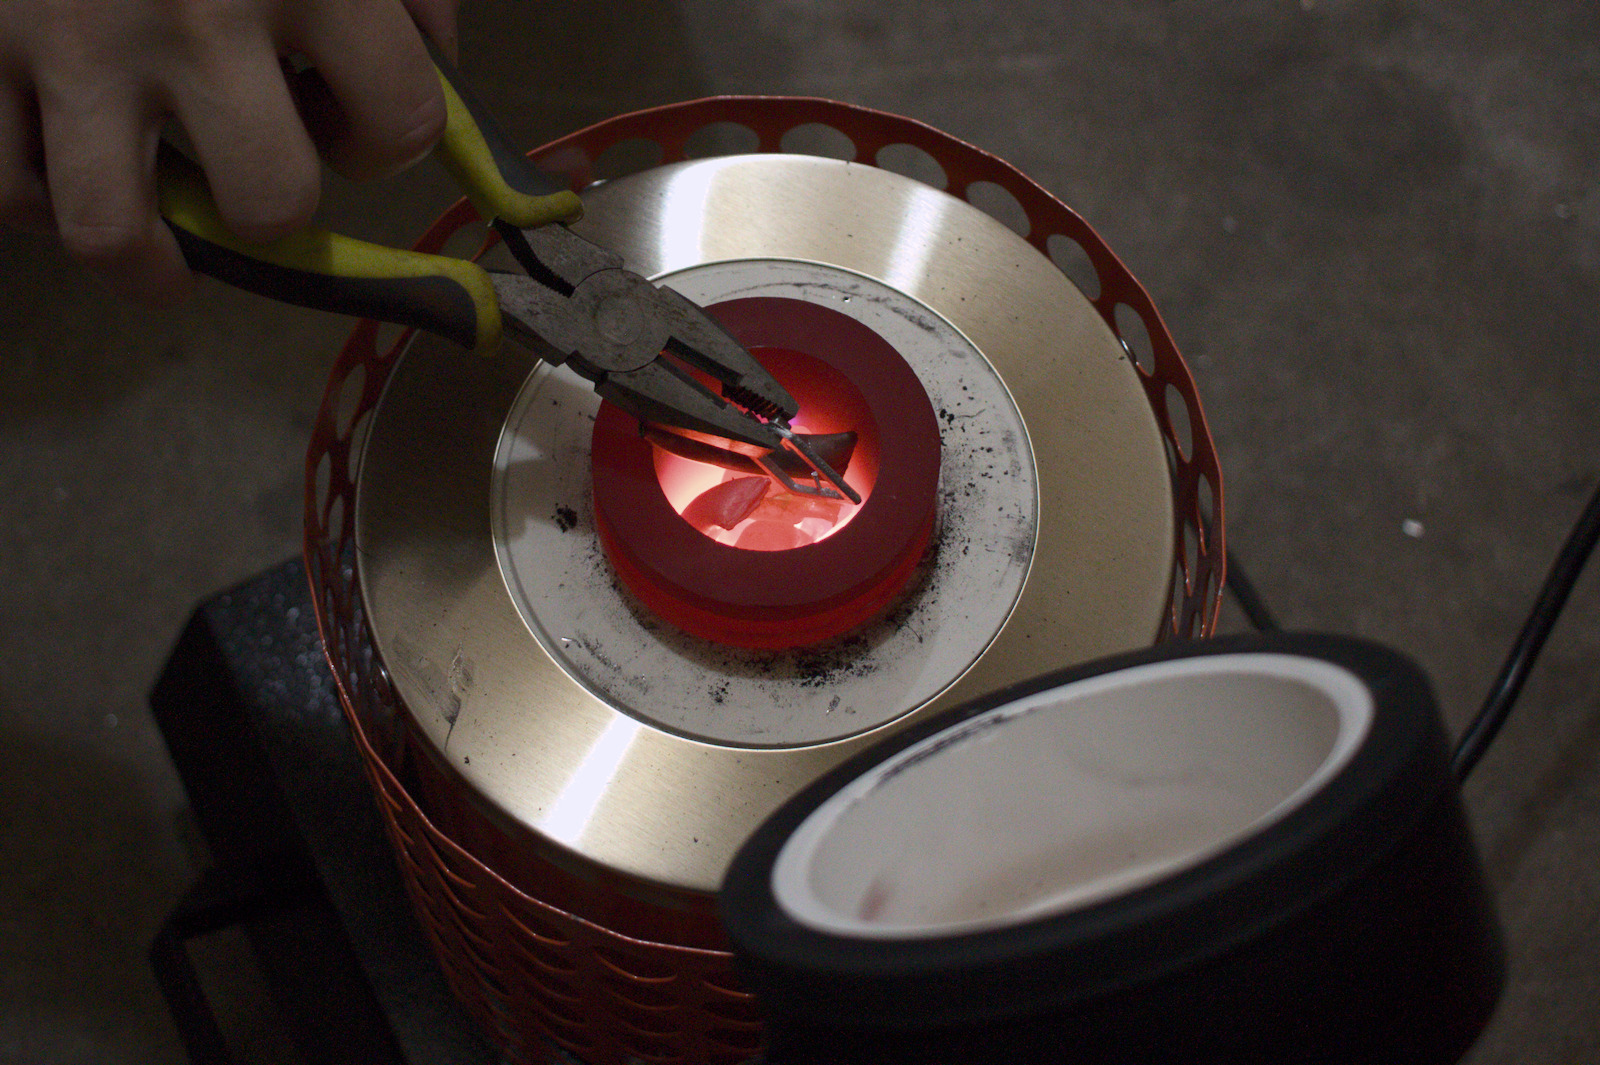
Compared to aluminum this was quite hot, and simply having my hand close to the crucible for more than a very brief time gave the sensation of being burnt.
Pouring seemed to go well, the metal clearly entered the mould, and flames appeared around the perimeter of the springform pan, which I took as a possibly good sign. As I wasn't too careful with quantities I wasn't sure how much I should have left.
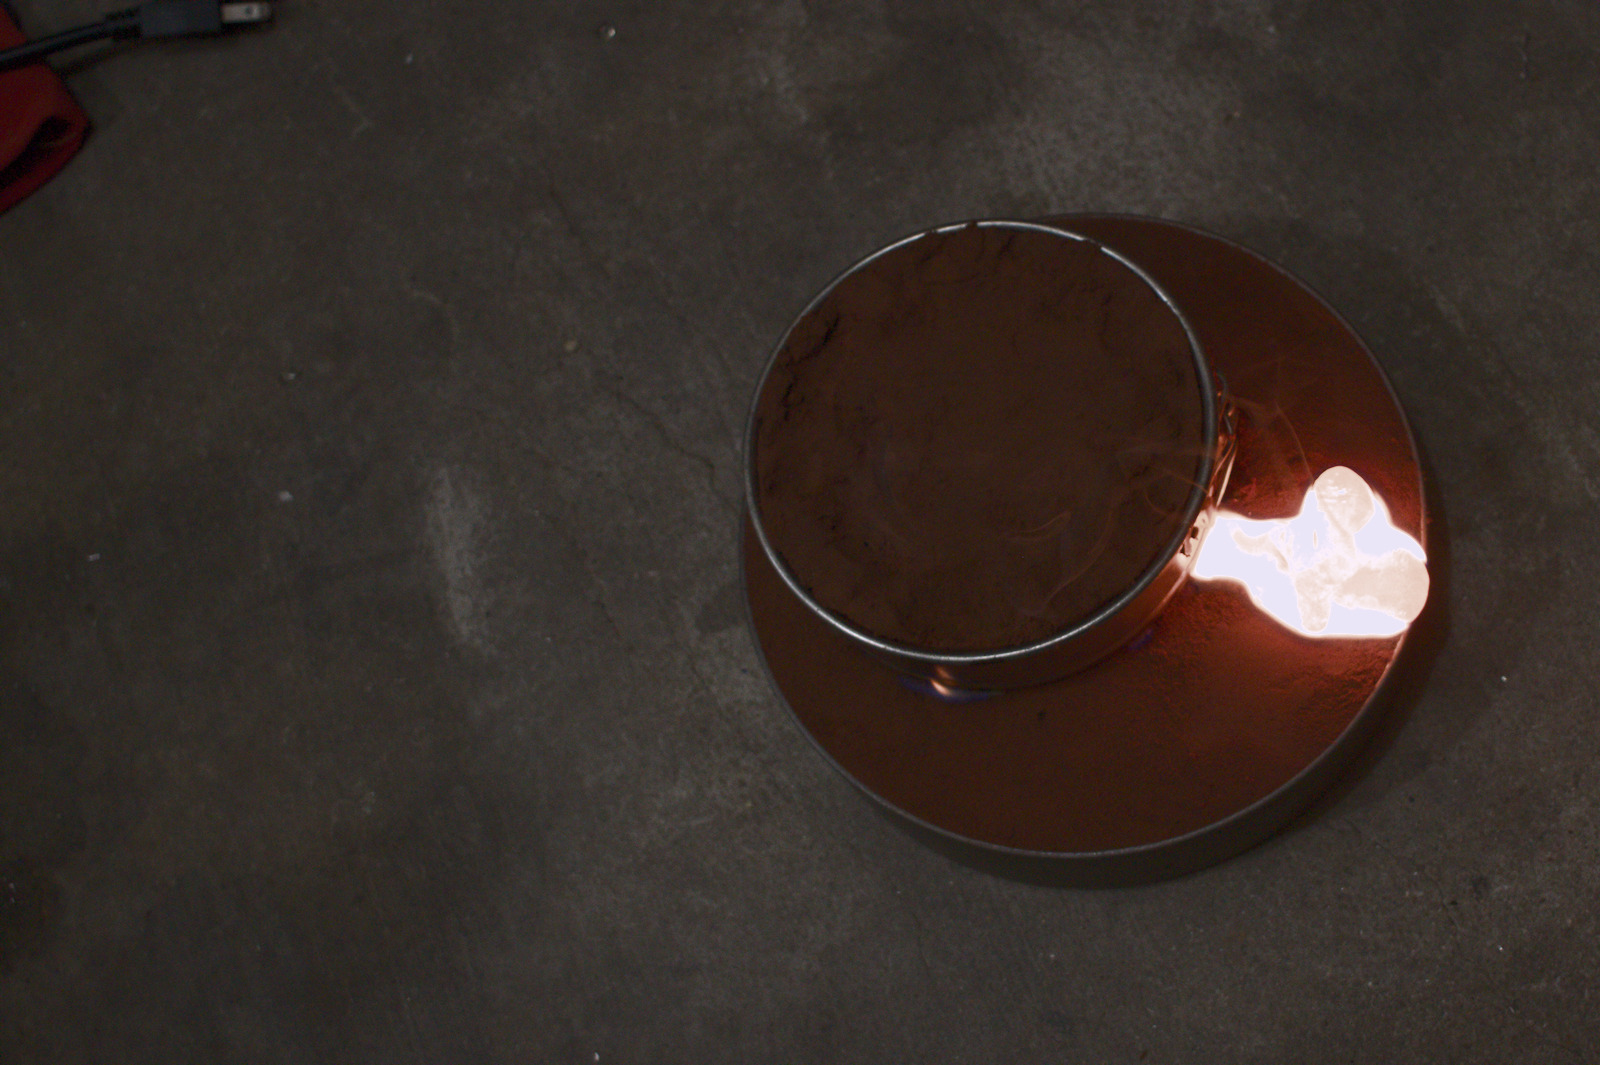
Unfortunately when I removed it it was clear that the metal had only slightly left the handle, and I would need to cast again.
Plan Revision and Second Pouring
For the second try I figured that if I poured from ontop, downward pressure would help force the metal into the void, and further that a more central ingress point would likely result in a better cast.
I prepared the sand a second time, slightly trimming the handle of the knife to make it fit entierly under the springform pan. This time the top part of the sand mould was given a funnel to enter around the base of the handle. I checked the alignment by shining a flashlight down the hole and peeking in, as there were no features on the cope except this funnel no further precision was required.
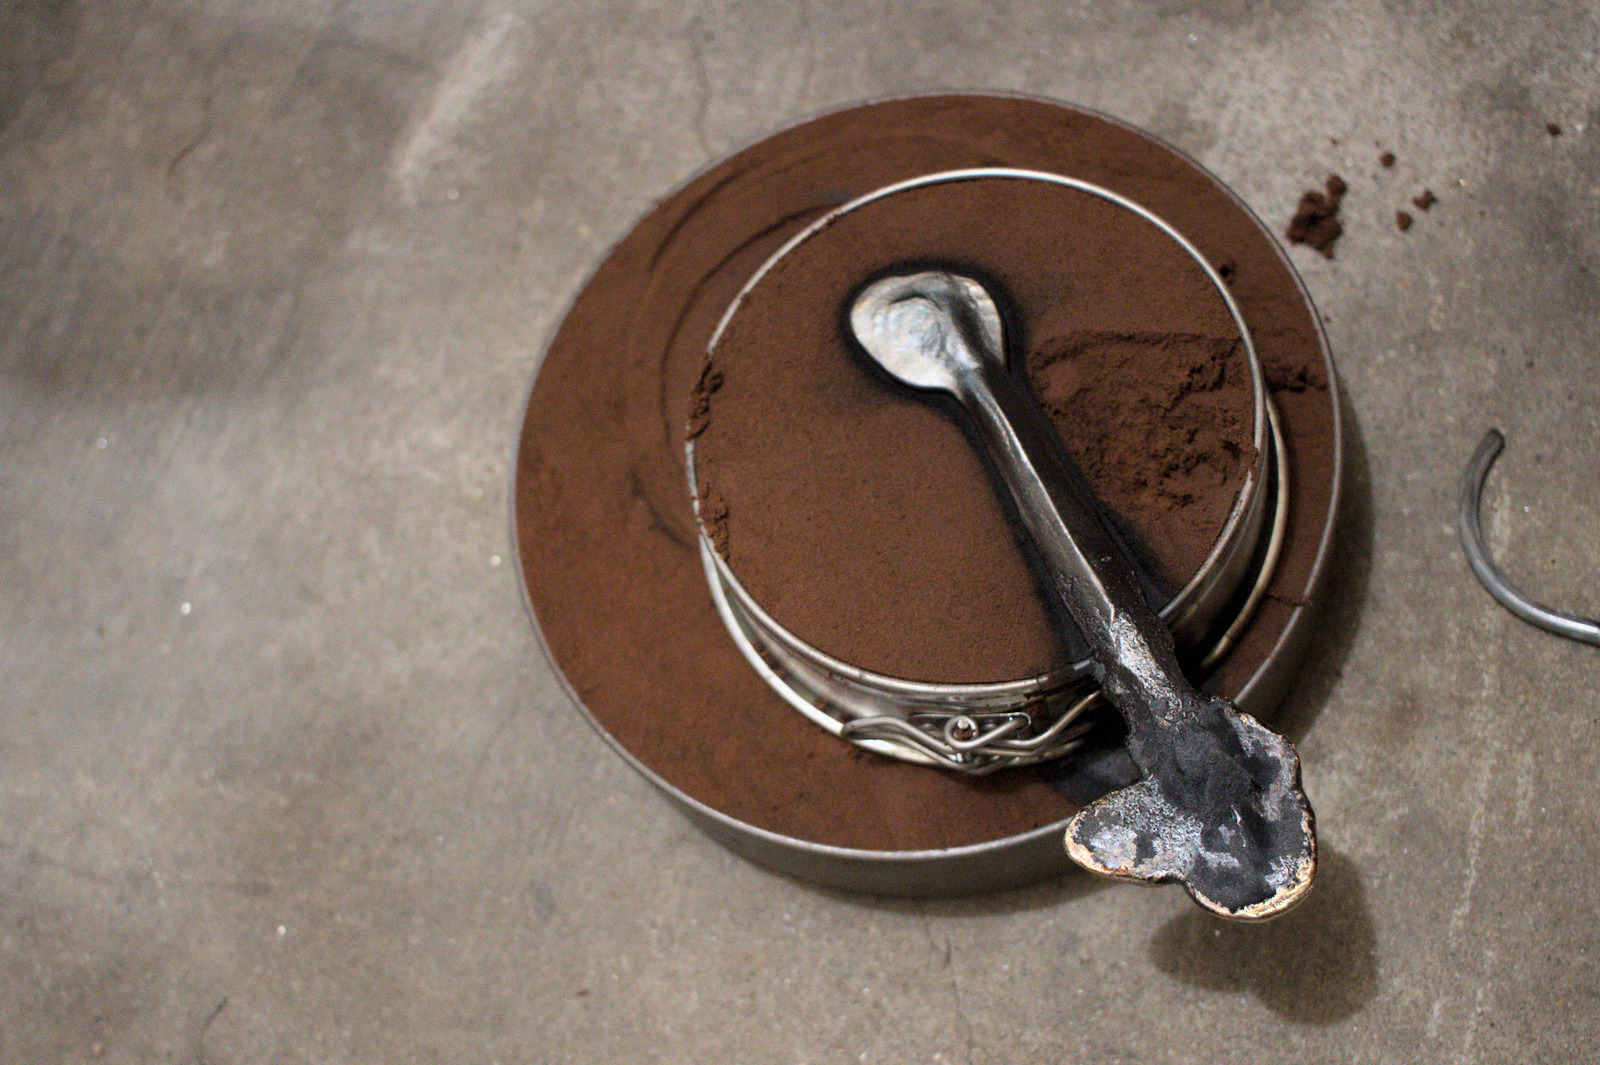
Once satisfied with the mould, and once the metal had remelted, I poured again. This time flames quickly burst out all around the rim of the pan and continued to burn for some time. I pressed slightly onto the pan and the sand in case upward pressure would cause runout, which only ultimately only occured on the base of the handle.
After the casting cooled somewhat I removed it to find a pretty successful result.
Grinding and Forging
After cutting off the funnel and the runout on the handle, I started grinding it down on a beltsander till it seemed more respectably shaped and locally smoothed. As I've heard that bronze workhardens well with a little forging at room temperature, I hammered the edge of the blade briefly to to make it flatter, and then ground it slightly rounder again. Being quite soft these both made quite clear effects very quickly, and I was a little afraid of accidentally sanding off the tips if my hand slipped at the sander. Fortunately this only slightly happened.
I attempted to get a decent bevel on the sander, so I wouldn't need to do so much grinding by hand later.
Sharpening
For this I just used a waterstone as I do for my other knives, pulling the blade across the stone while rolling it at a more or less constant angle. After a bit of this it became apparent there was a problem, for a large and persistent burr was developing on the edge, and would not easily dislodge, except ultimately giving way to a new burr. Unlike the burrs I am used to with steel knives this one was large enough to see, and I was able to flap it back and forth with my finger without causing it to break off.
The solution to this seems to be to sharpen with circling movements instead, or by pushing the blade into the stone rather than drawing it out.
After a while of this I was able to get a fairly sharp blade, and did a few test cuts. As expected it seems to dull fairly quickly, but stropping between cuts kept it going quite well.
Wrapping the handle
While the unfinished bronze look is not all together unpleasant I figured it would be easier on my hand to cover the handle with something softer. If I hadn't initially planned to pour the bronze through the handle, I'd probably have left the handle as thin as the blade.
At first I thought the handle was a little short but I think it might be alright as it is, so I chose to simply wrap the handle with some relatively thin leather. This was done by wetting a rectangle of leather (cut with the knife) to a somewhat larger size so I'd have space to clamp it down, and then pulling and clamping it tight while it dried. Once dry, I marked stitches, sewed it up, and trimmed the excess.
After finishing I decided, perhaps a little late, that black and gold go well together, so I dyed the handle black with ferric acetate, or vinegroon.
Concluding Thoughts
Having never made a knife before, I'm generally satisfied with the results. If I tried it again I think I'd do more forging and less grinding, and try to make it with a smaller tang about which to place a different style of handle.
It seems to cut perfectly well, and will certainly be used. I suppose I shall see how I think of it after that.
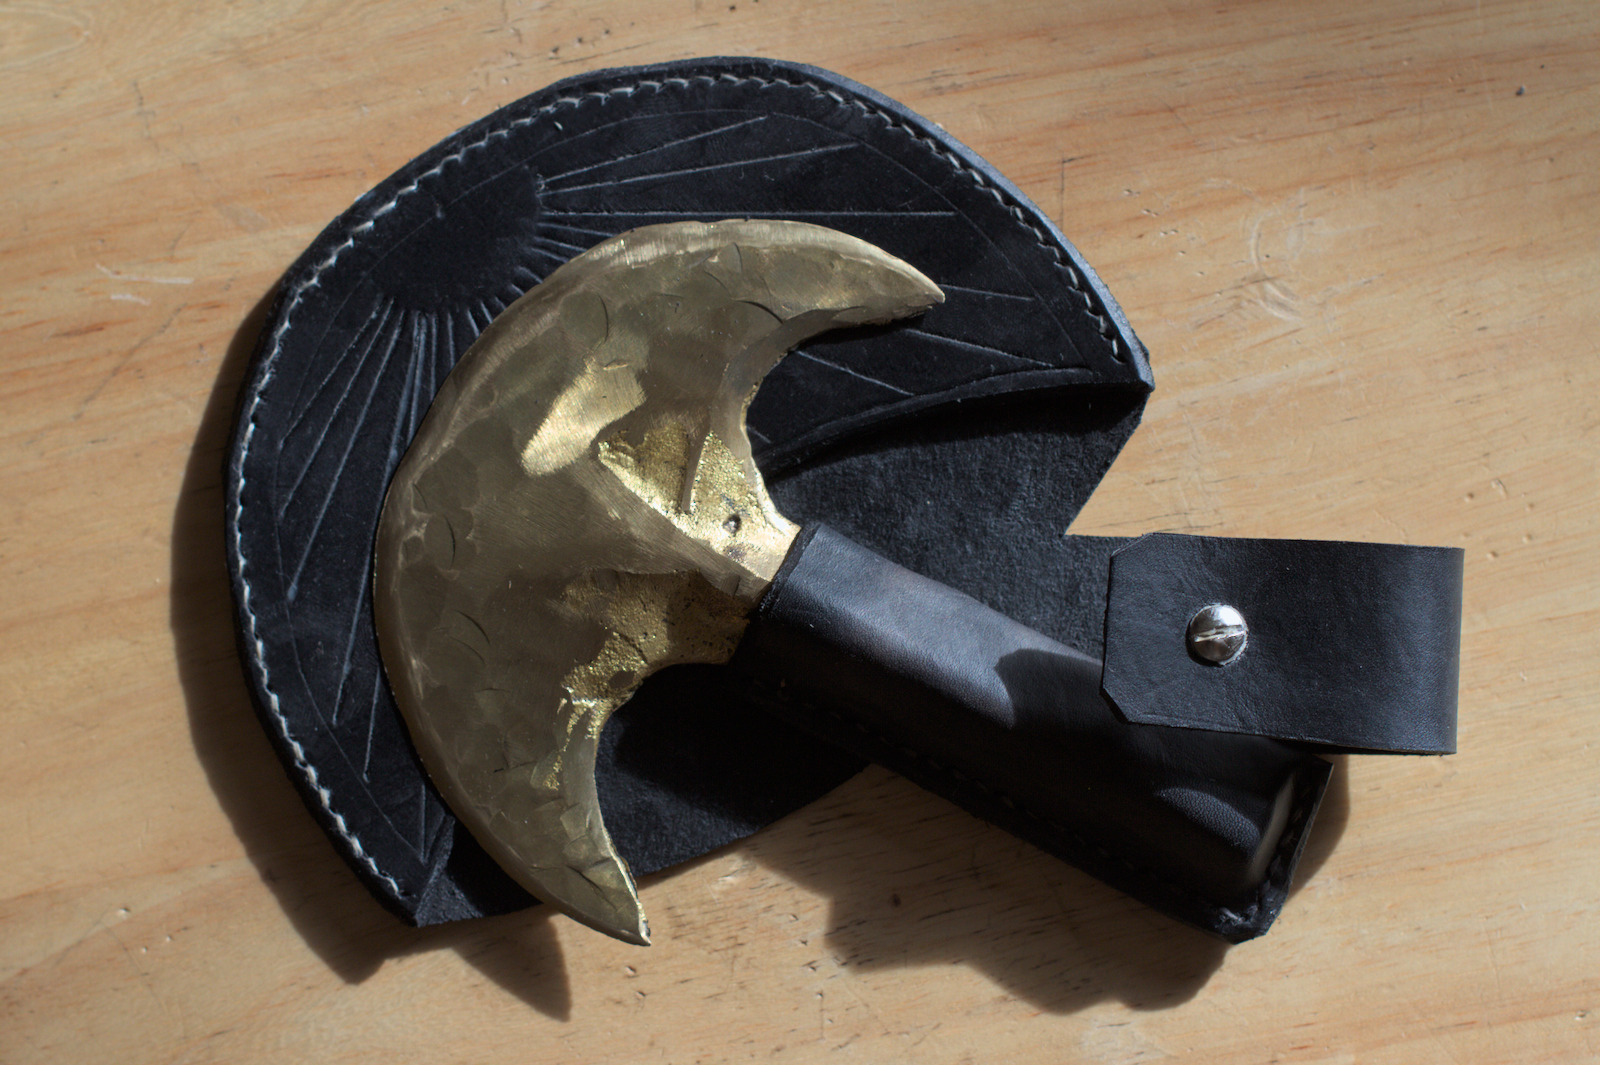
Finished knife with sheath. The handle and sheath were cut out using the knife.
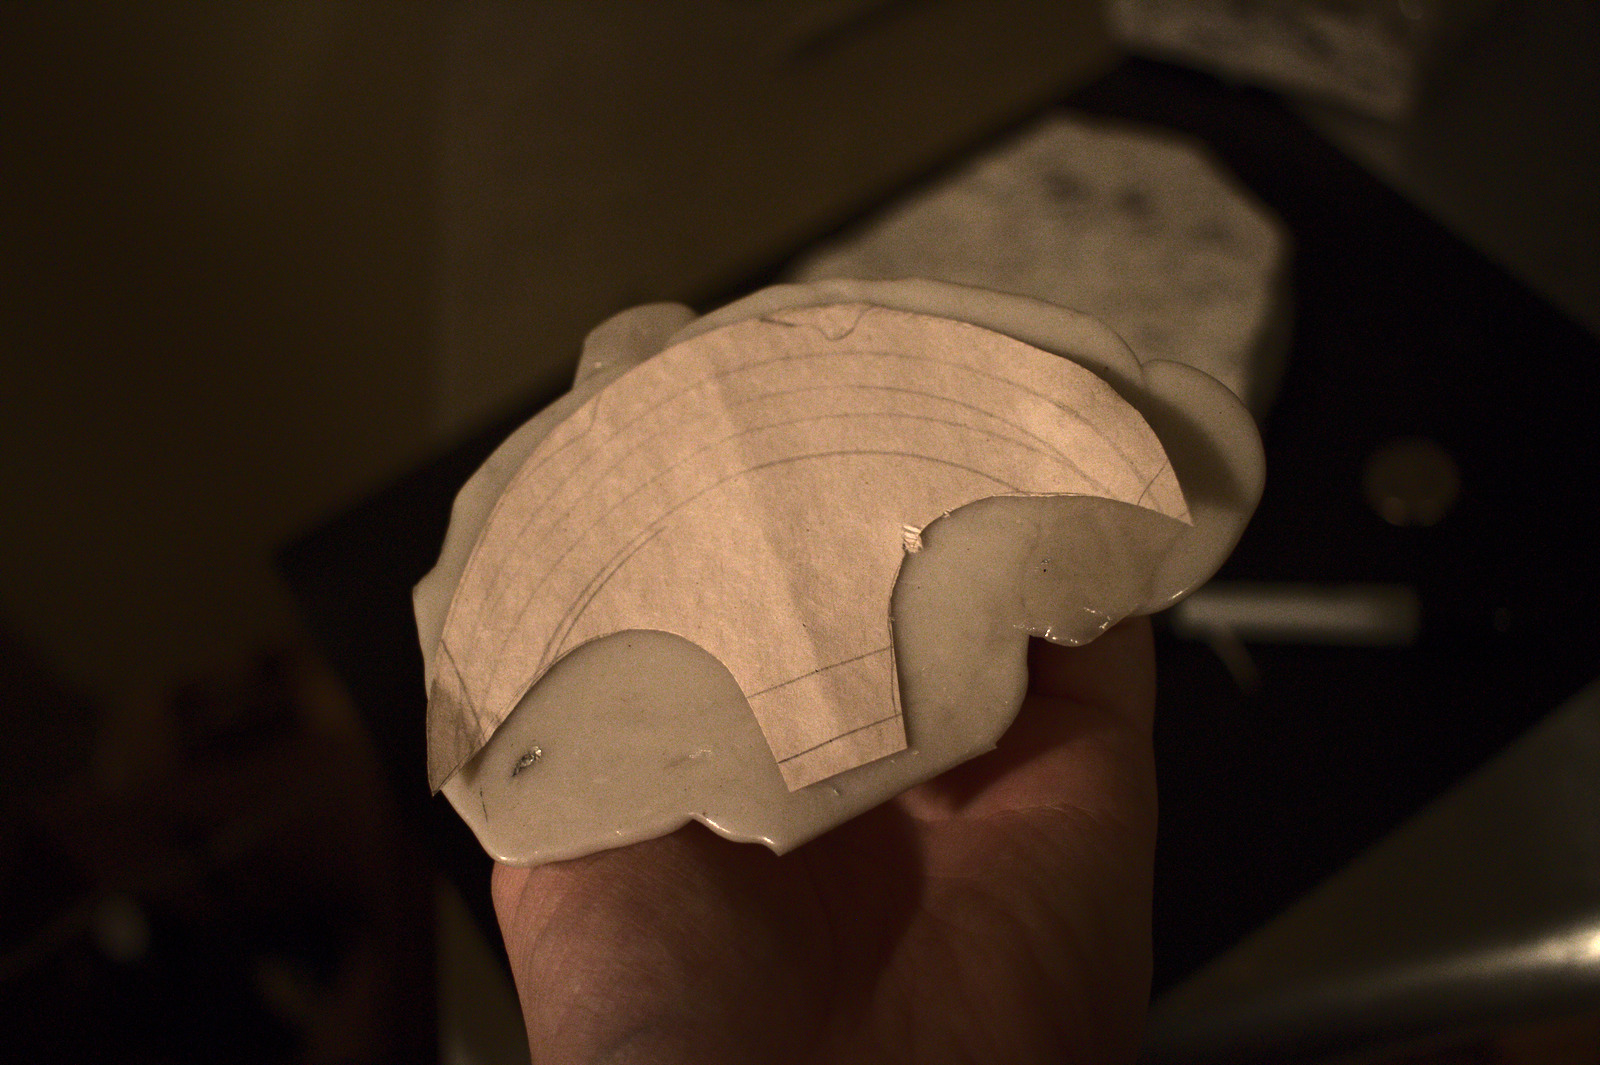
Checking the size of a PCL blank against the pattern. This isnt the blank I used, as I figured I should give some length for the handle as well as the blade.
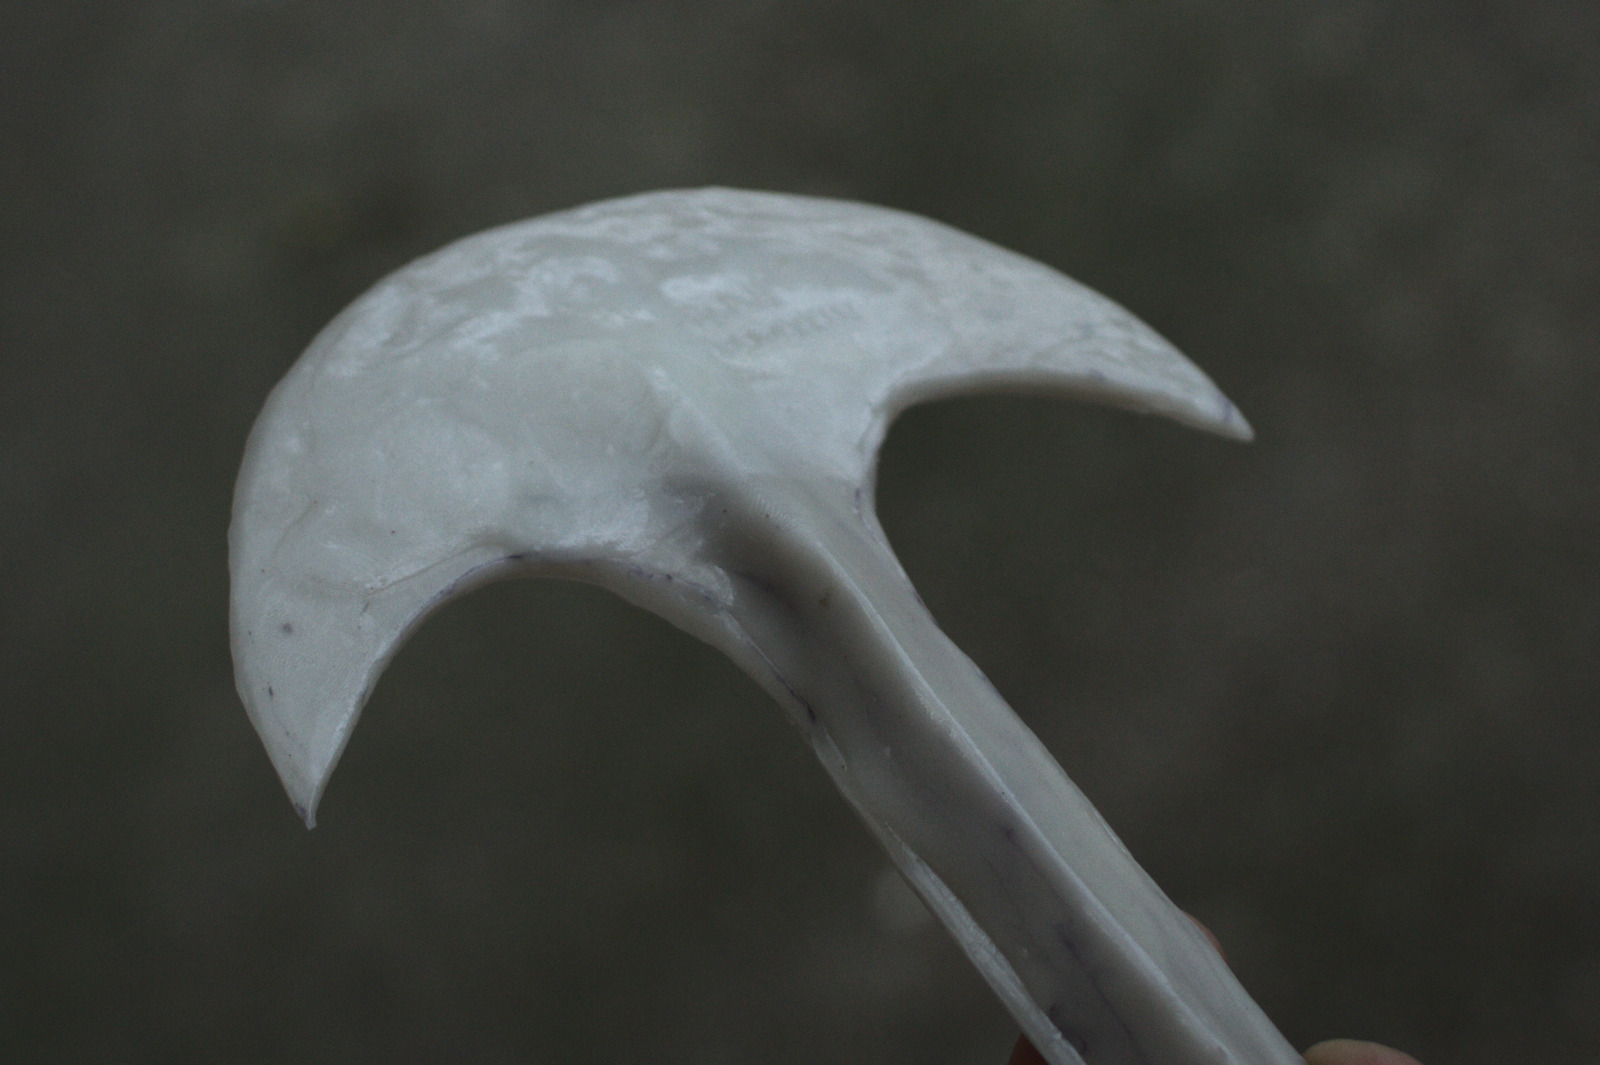
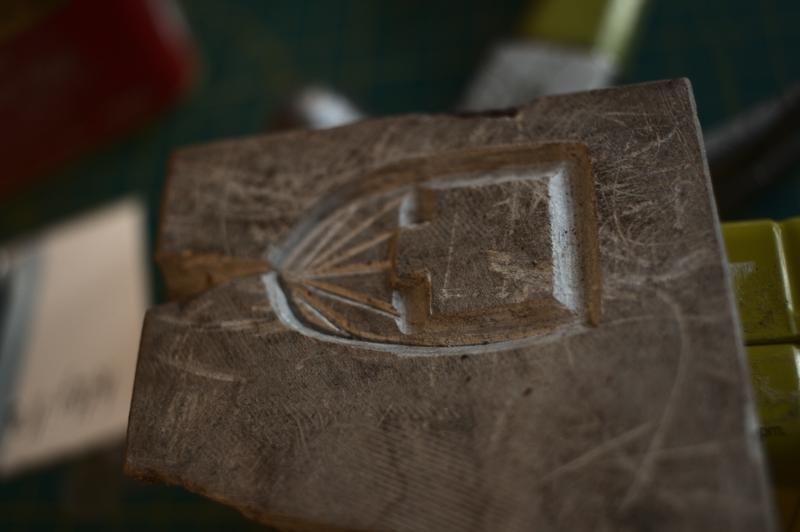
The finished PCL positive. The thick handle was initially meant to serve as a channel for the bronze to flow through on its way to the blade.
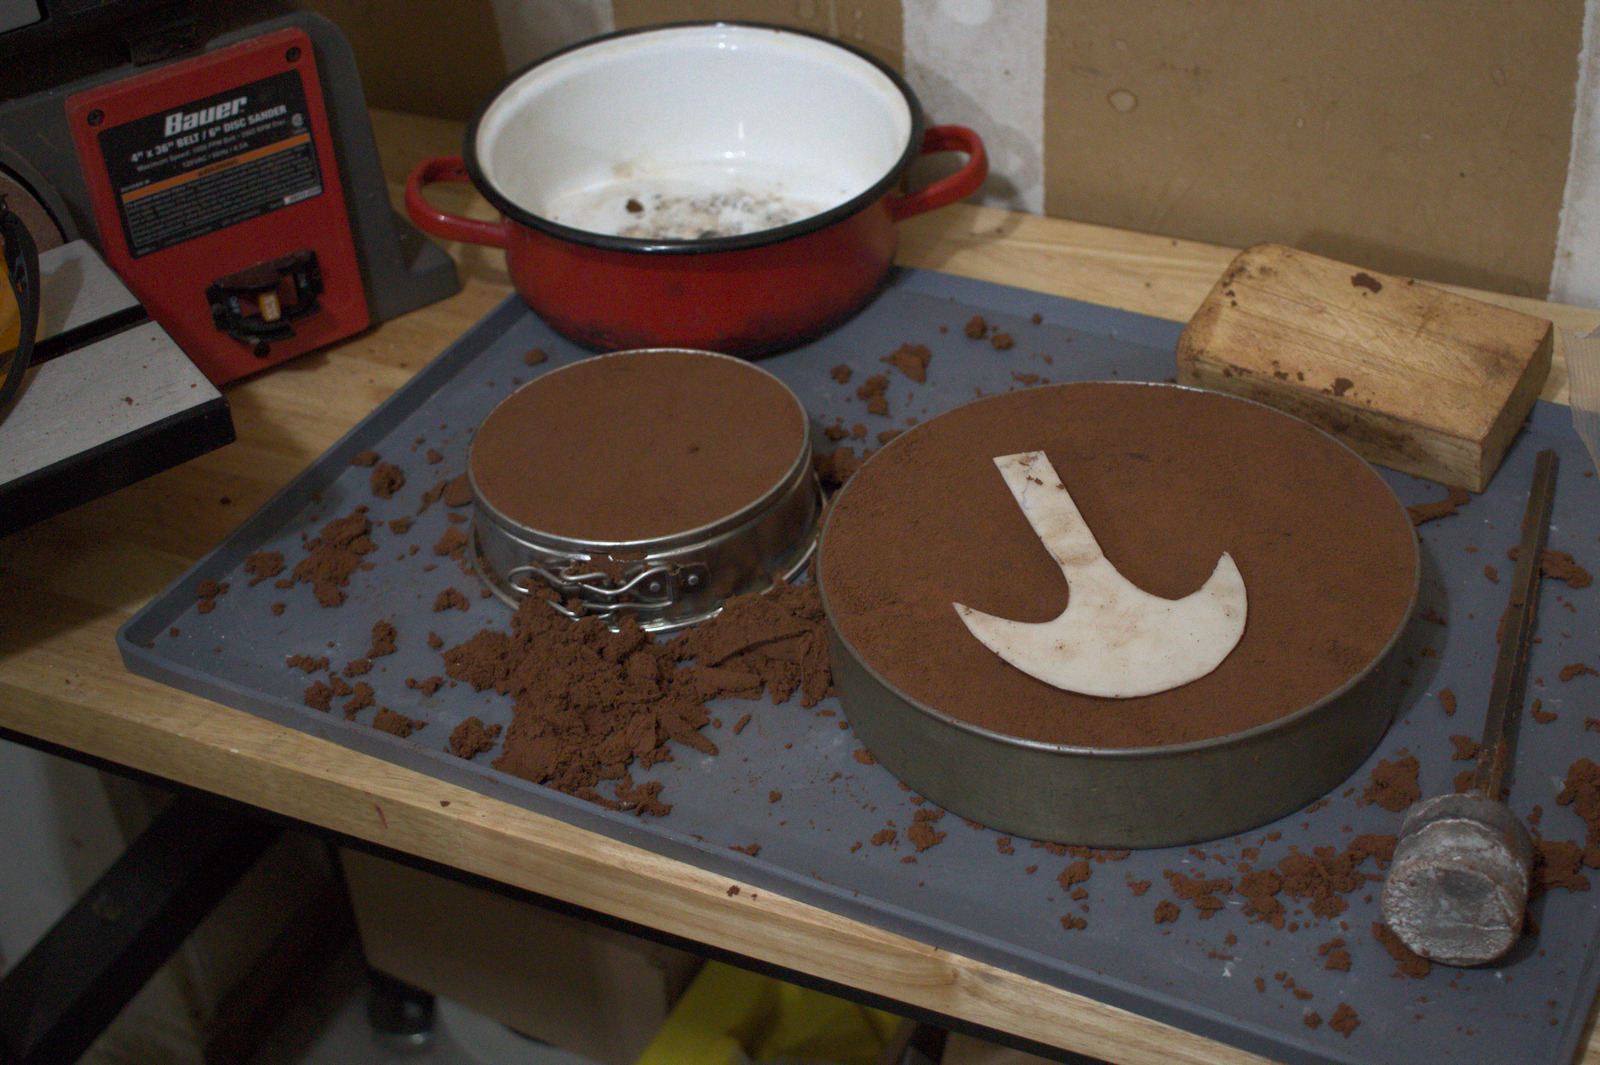
Preparing the sand. On the left is the springform pan rim, which was just to sit over the cavity left by the PCL positive. On the second pouring, I carved a funnel into this peice.
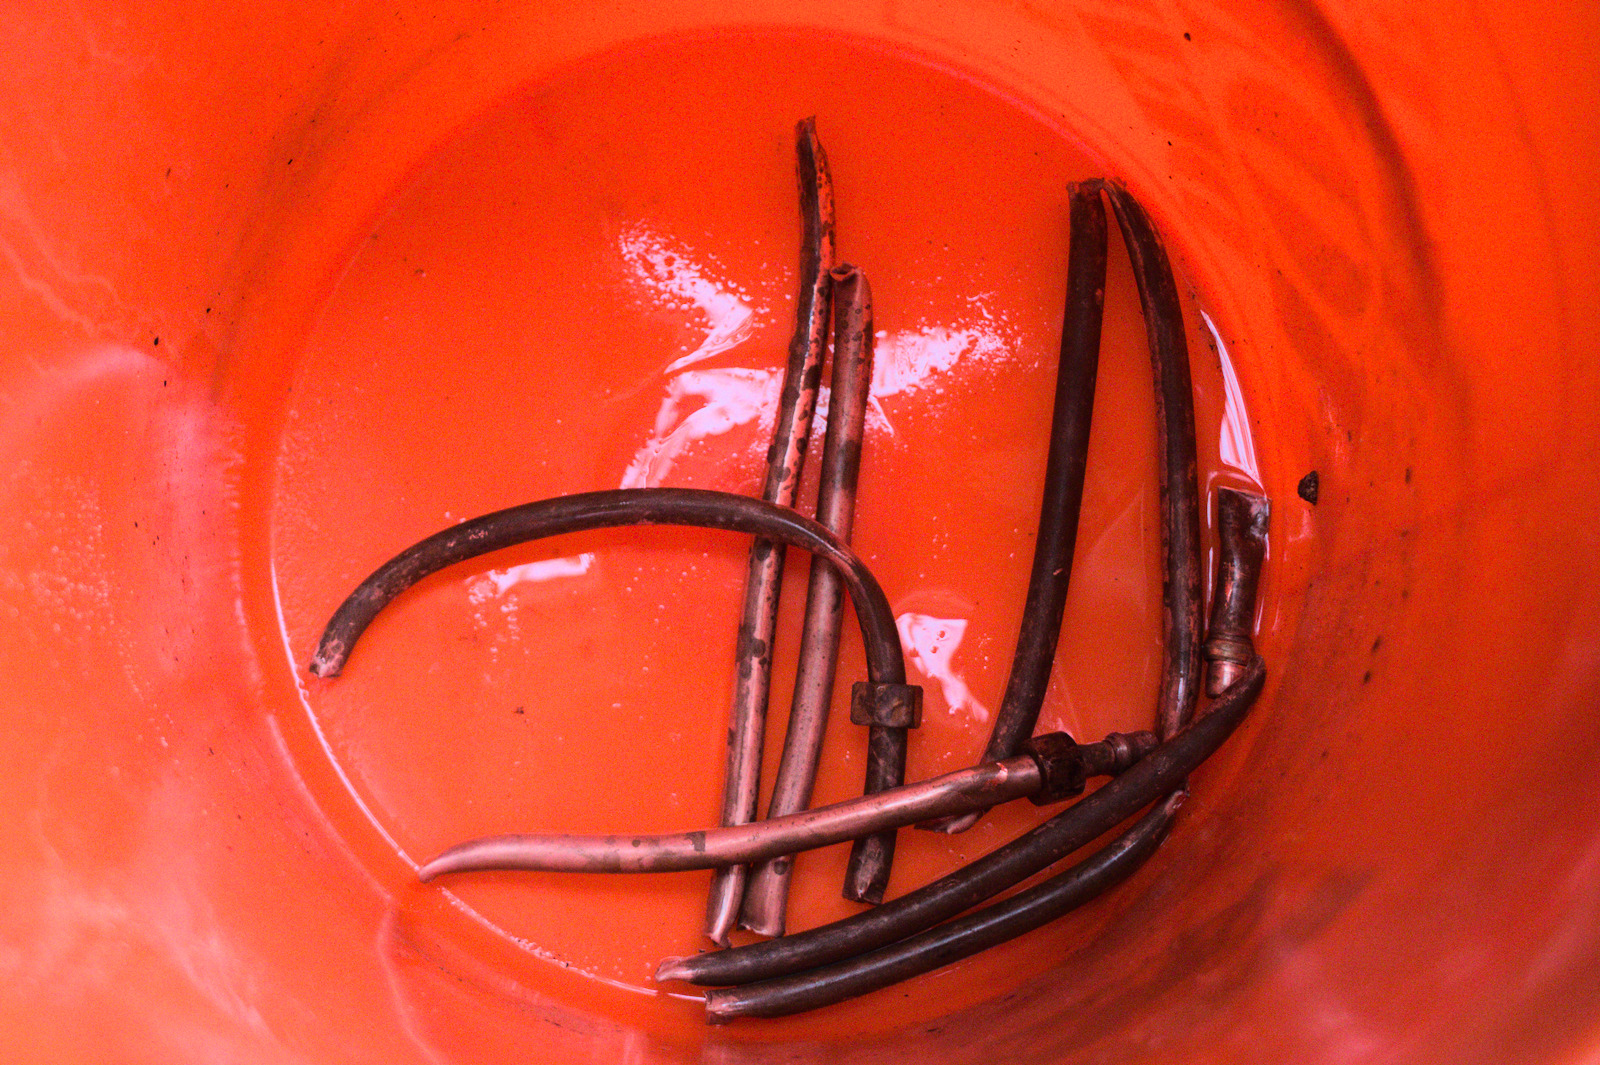
Scrap copper during cleaning
Adding some aluminium to the crucible.
The first pour. You can see flames licking up under the pan rim, and quite a bit of metal which should have flown in but didn't.
The failed result of the first pour.

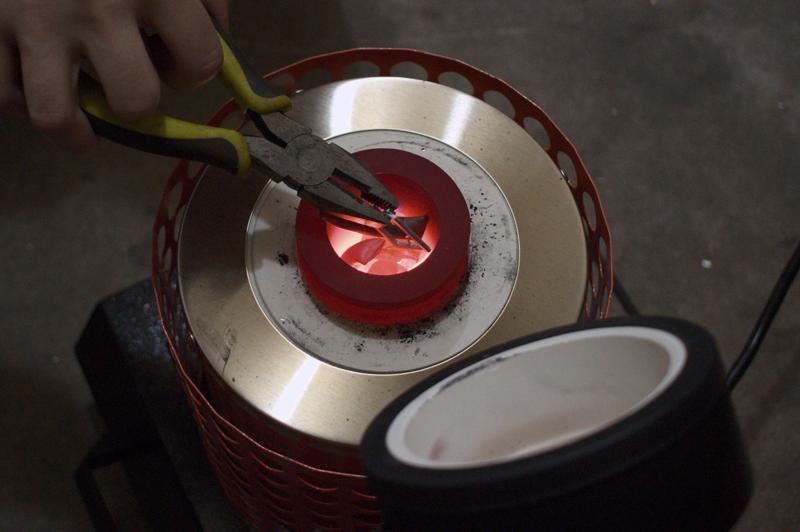
The second pour. The dark metal in the springform rim is in the funnel, the glowing and burning part is excess the spilled out near the base of the handle.
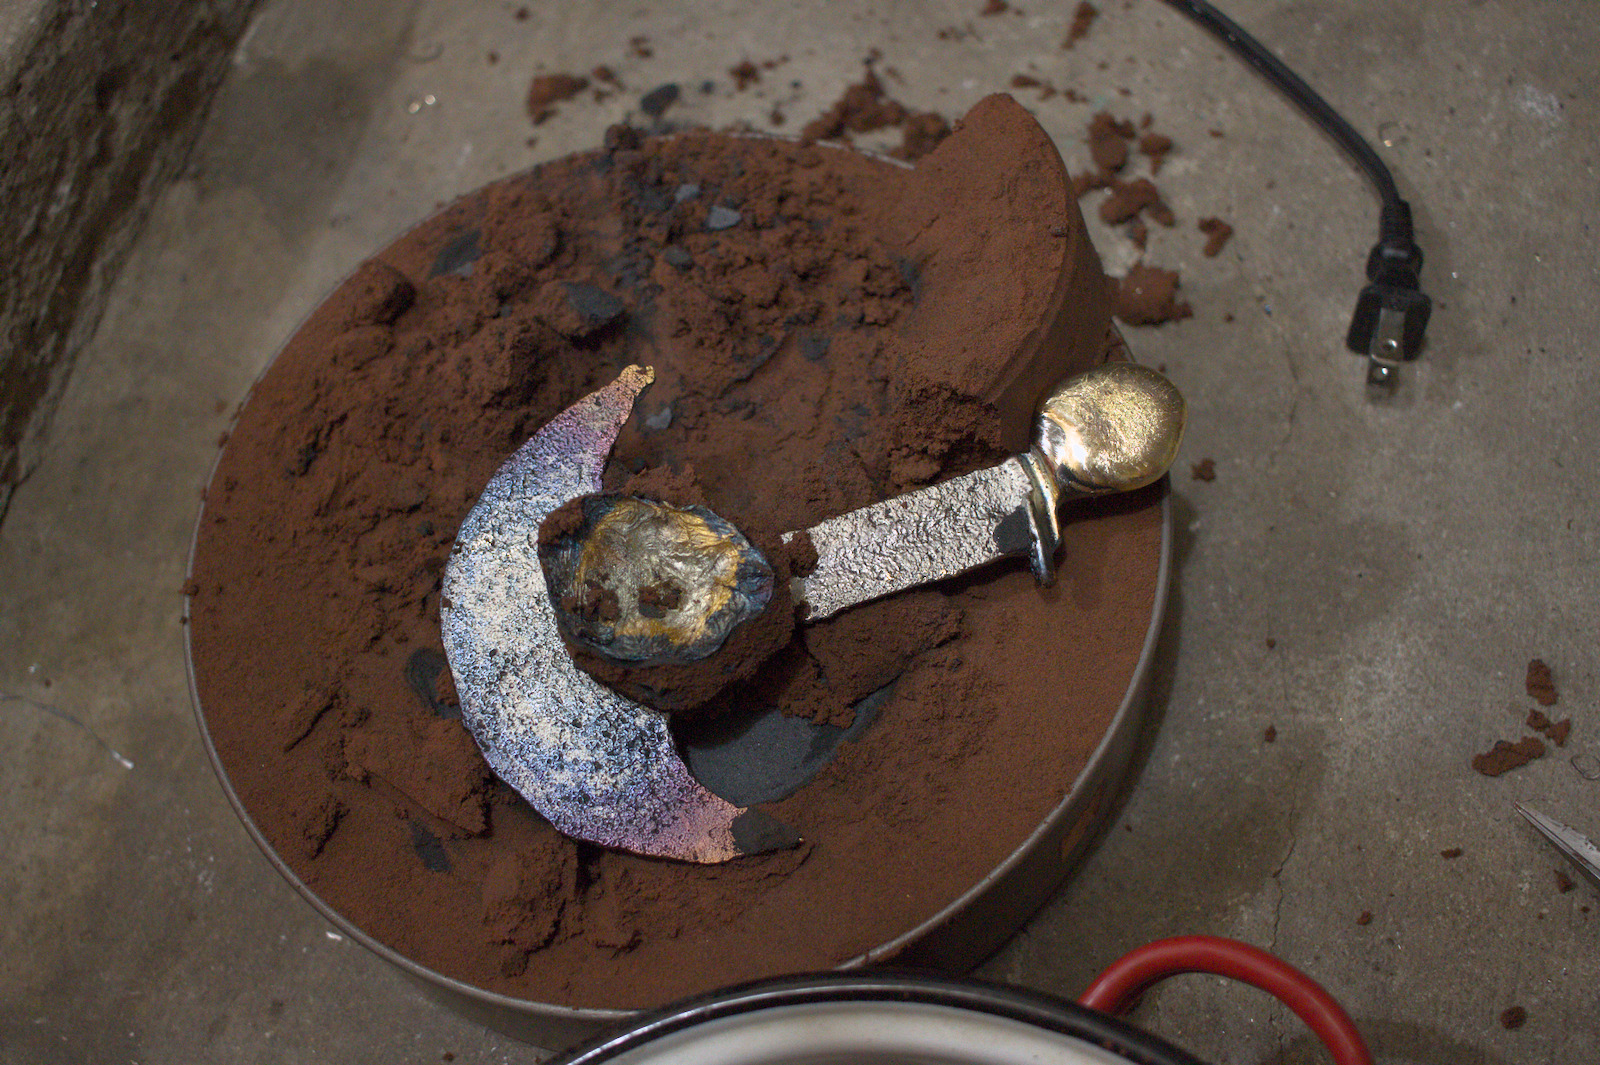
The successful result
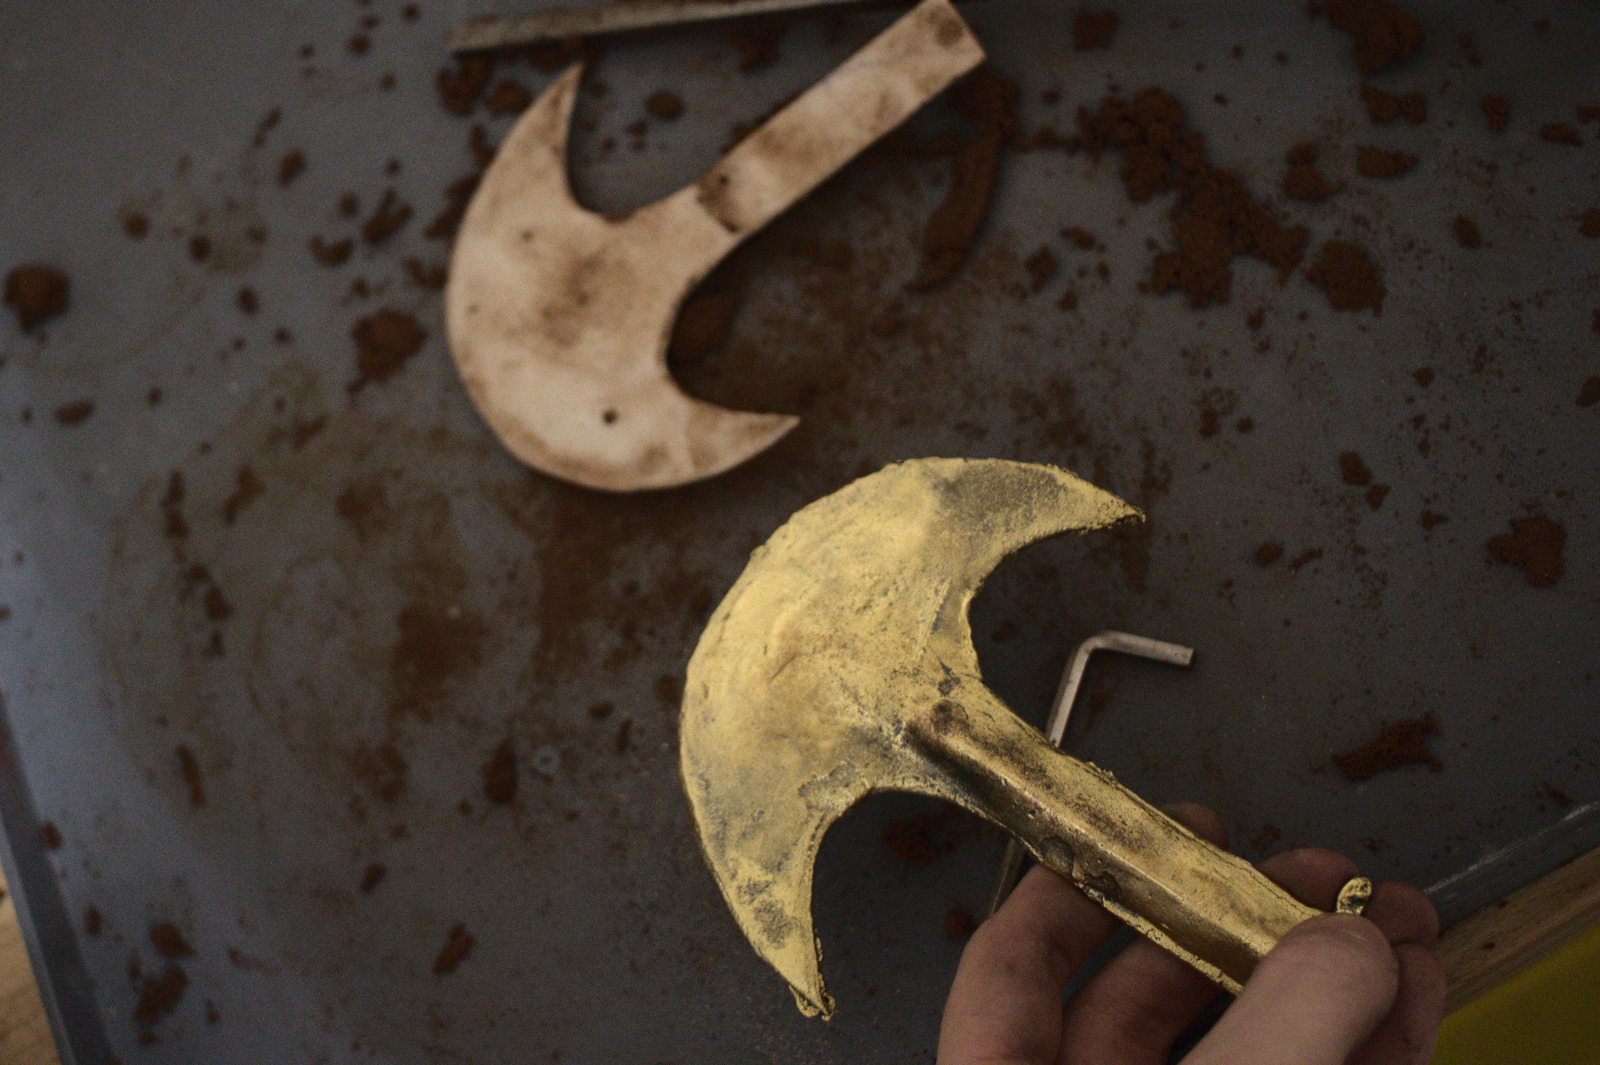
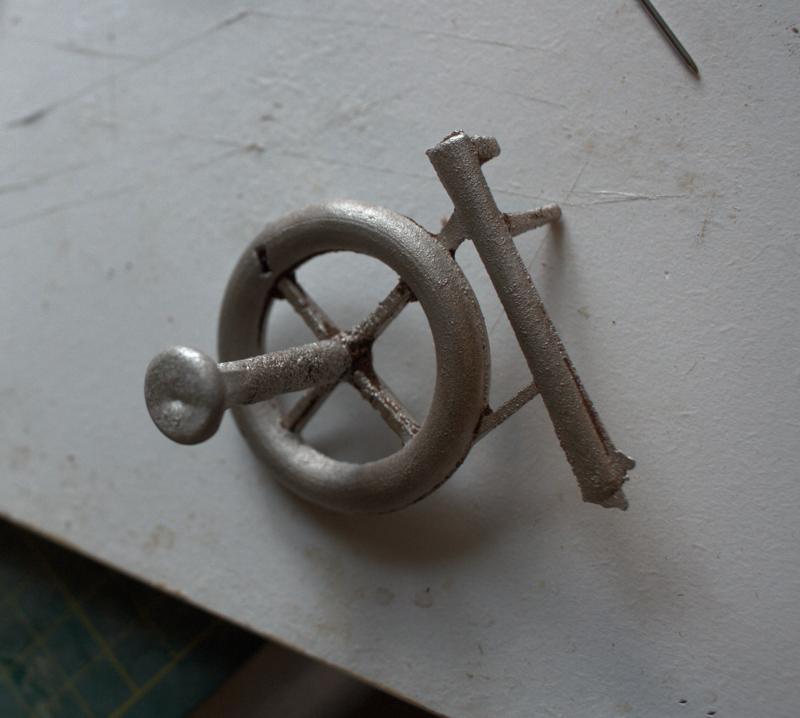
After a small bit of cleanup. You can see the positive sitting in the background.
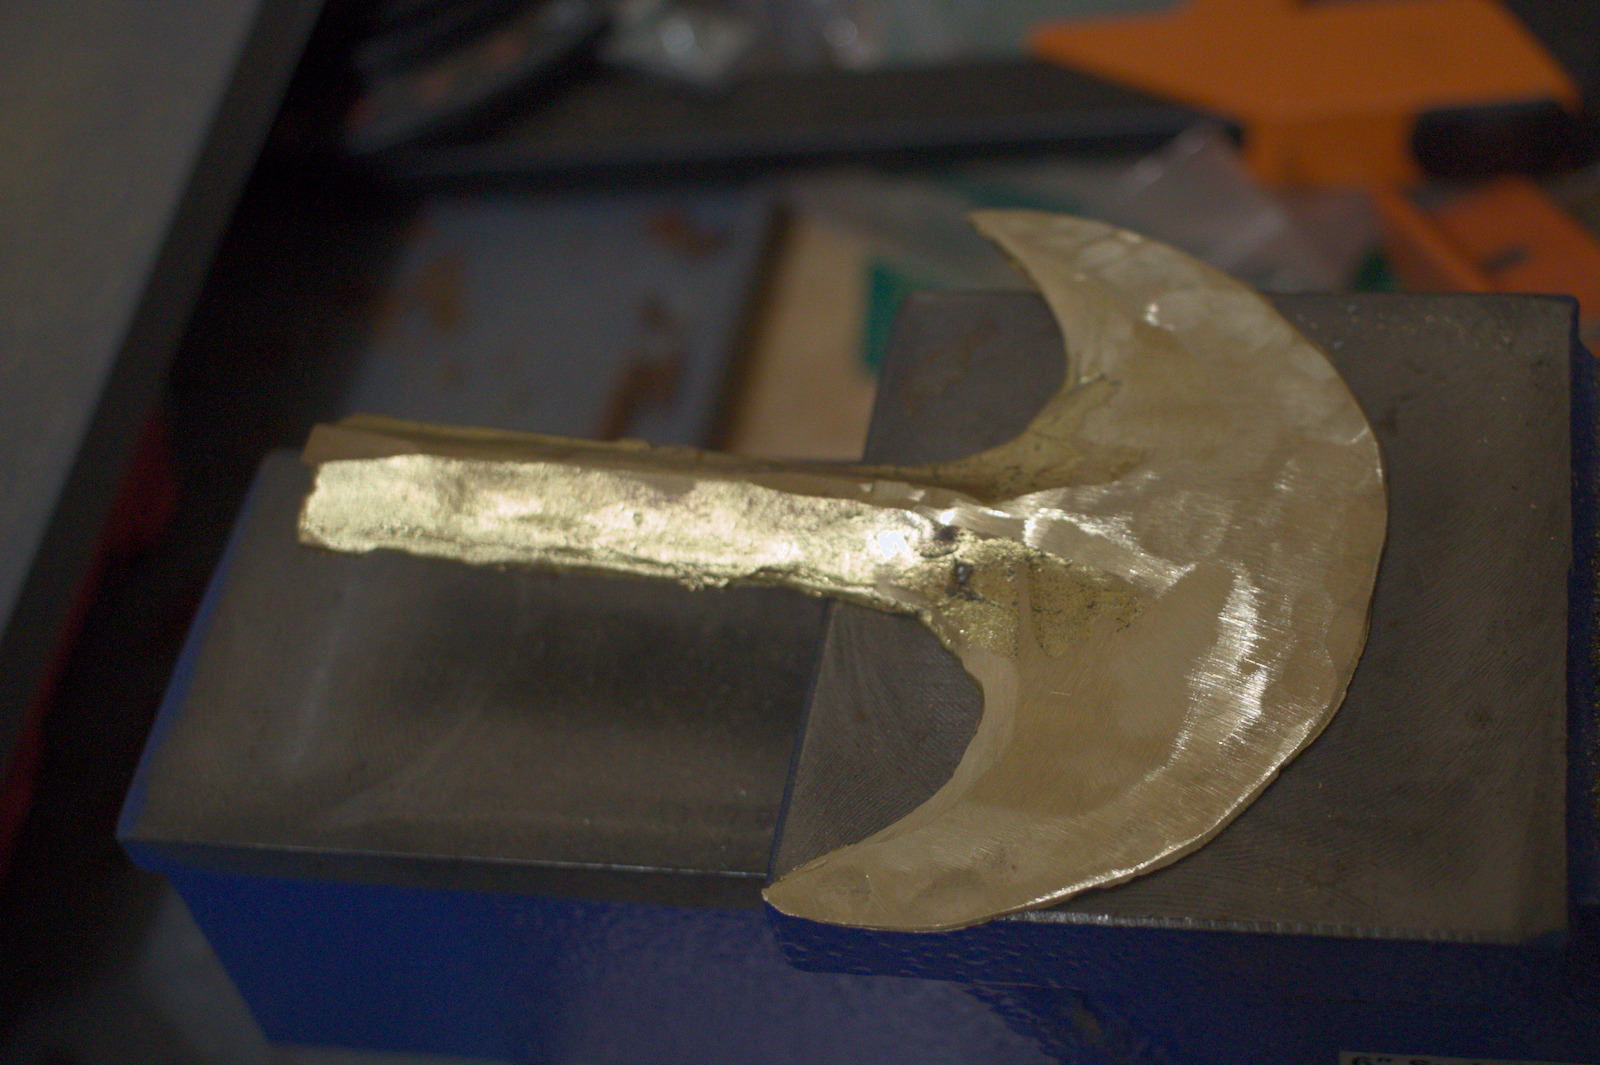
After a considerable bit of grinding and a little bit of forging.

Detail of the blade showing a pesky burr.
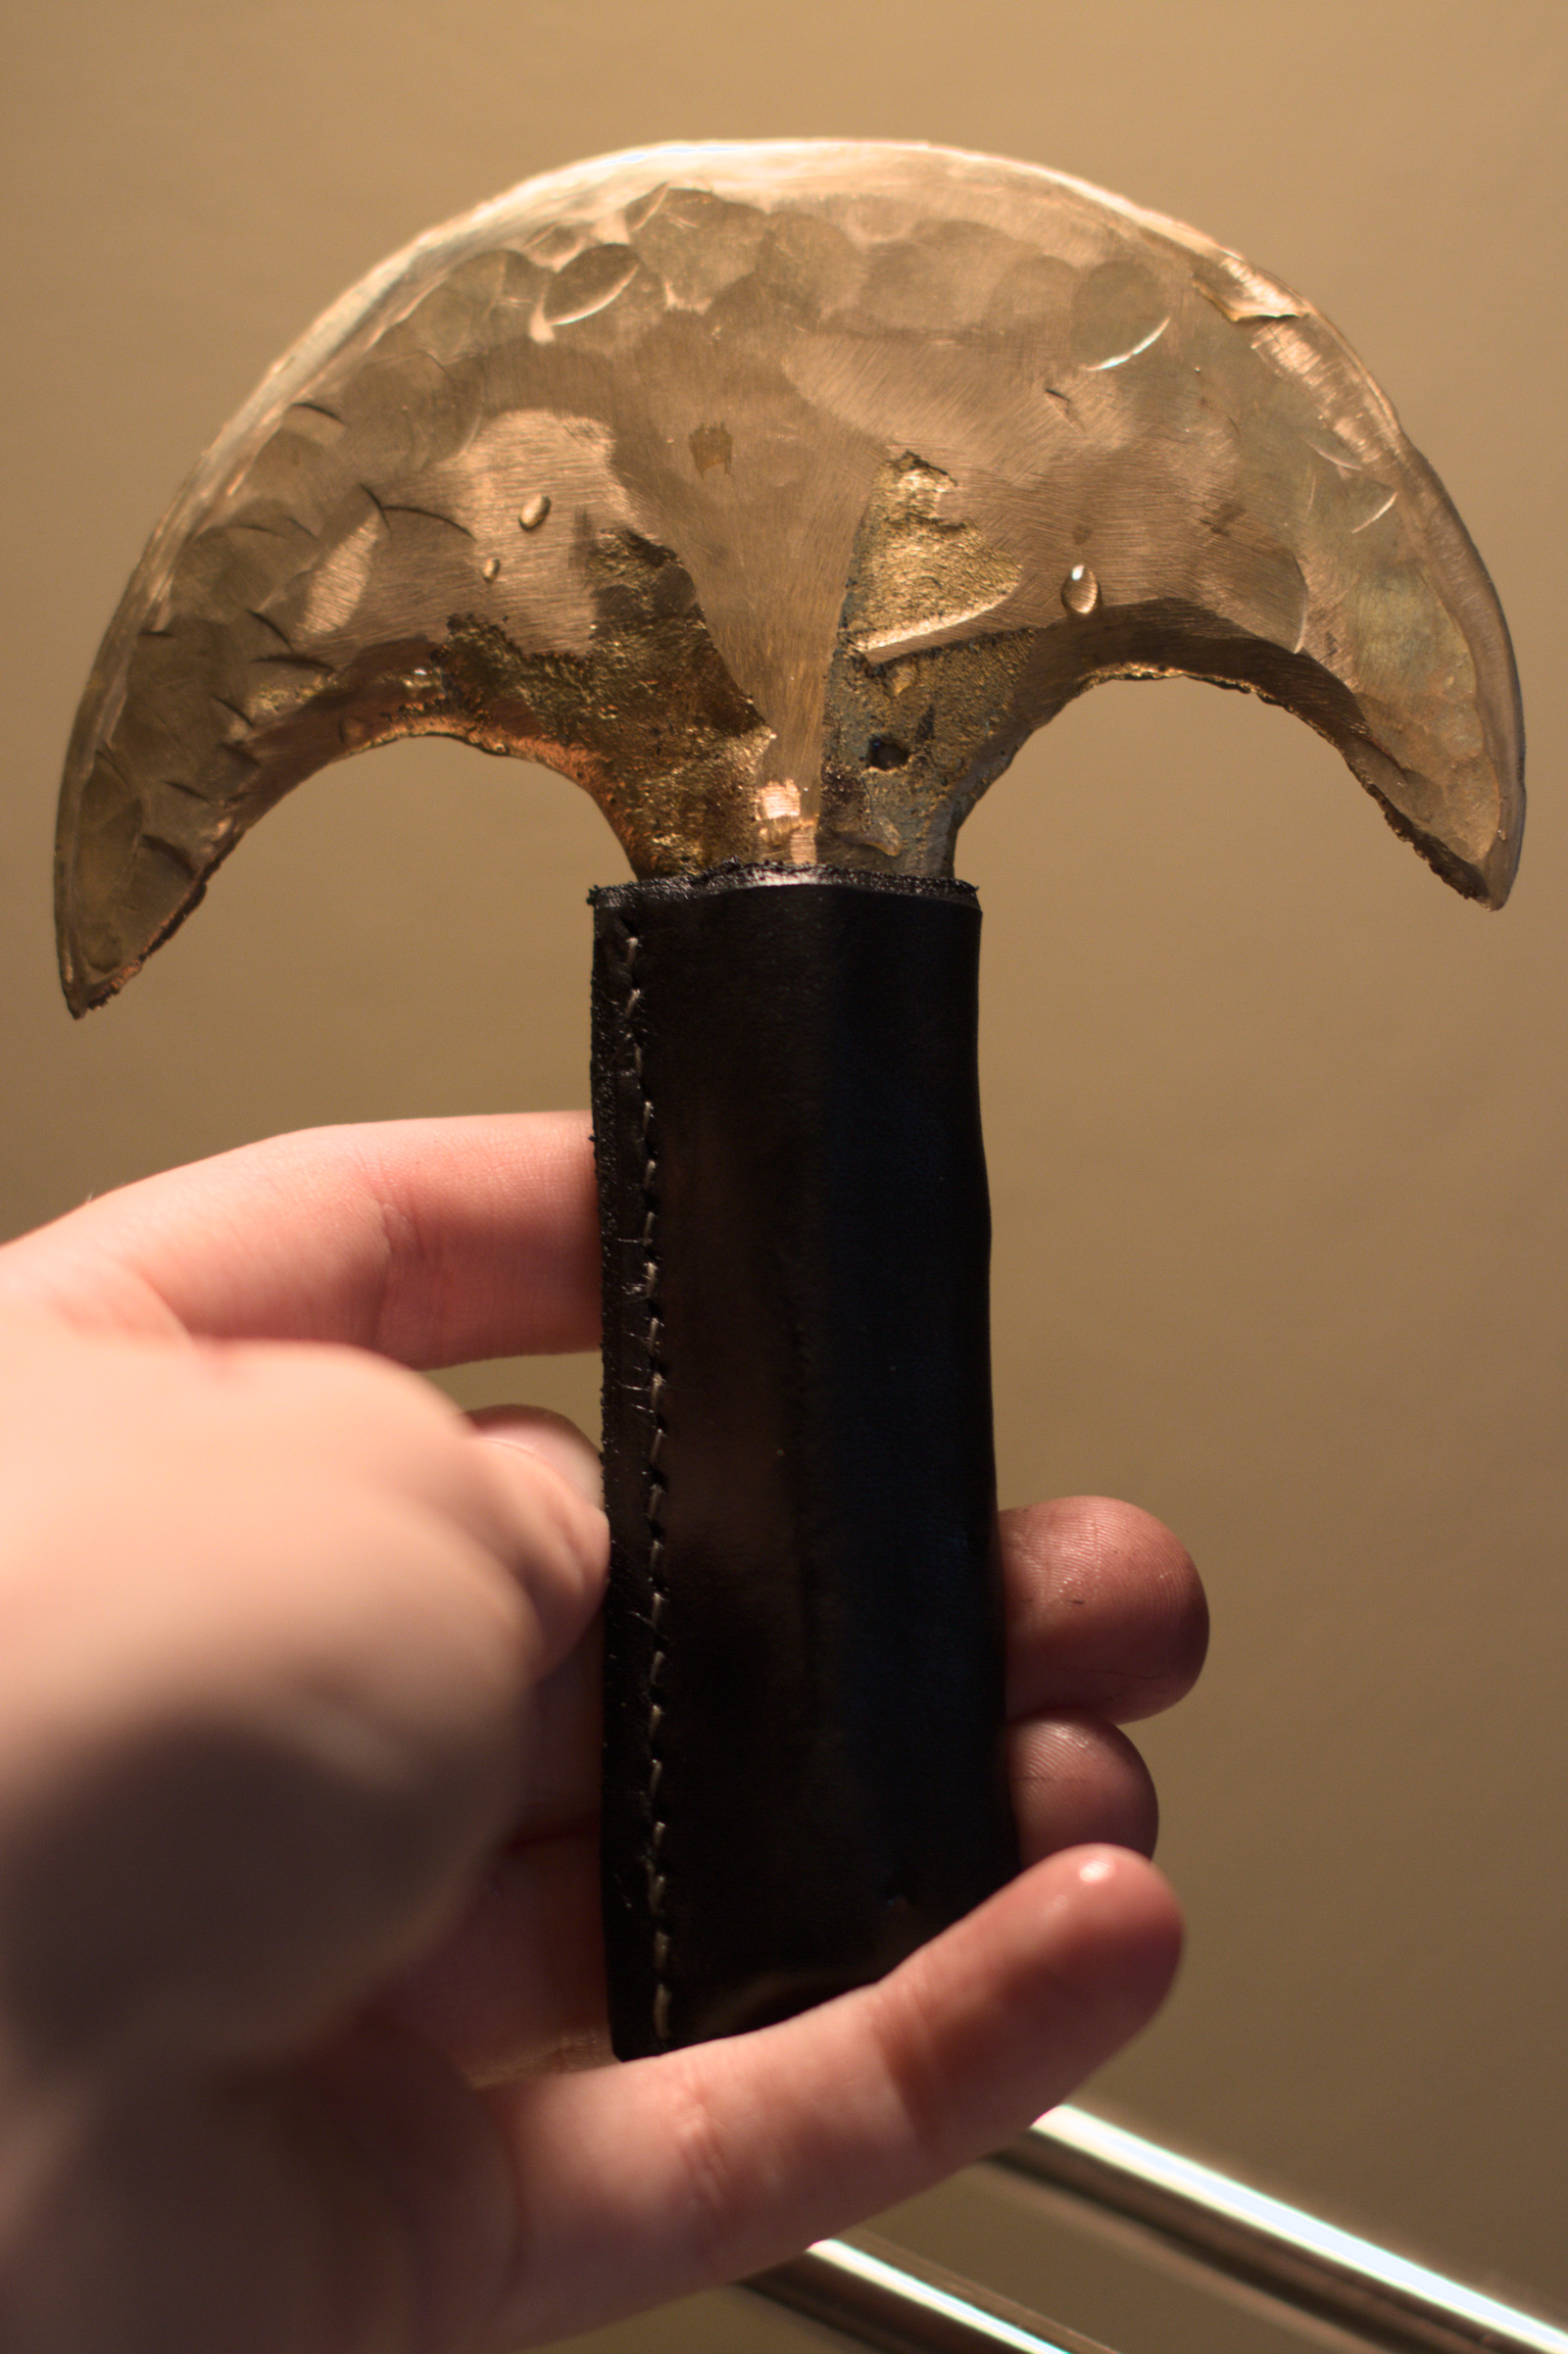
Essentially finished